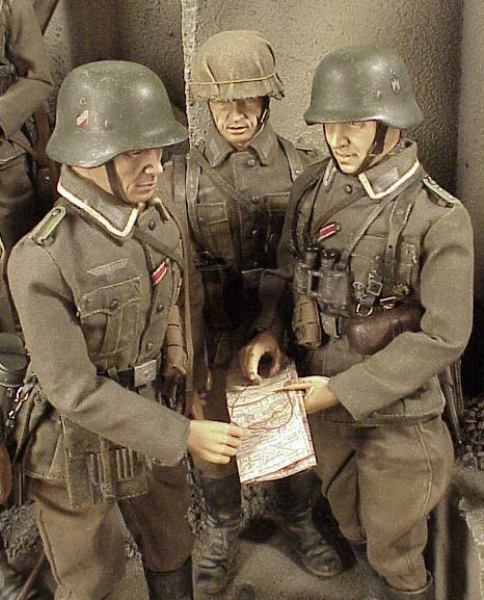
Action Figure 1/6 Scale

Home Page About Page Whats New Page Catalog Page Photo2 Page Photo3 Page Photo Page Photo4 Page Photo5 Page Photo6 Page Contact Page Favorite Links Custom Page Guest Book Page My Photos

One Kilometer from the Volga

- Stalingrad 1942


2.Panzergrenadier-Bataillon I
Panzergrenadier-Regiment 21
24. Panzer Division
XXXXVIII Corp, 4th Panzer Army
Army GroupB
Barrikady Industri
al Complex
St
alingrad, September 29 1942


“On 29 September, 24th Panzer Division renewed its assault, and by the end of the evening Solugub’s hard pressed 112th Division has retreated into the Silikat factory to the west of the Barrikady complex. To the immediate south, the German attack on the junction of the southern end of the Barrikady and the northern end of the Red October site had succeeded in driving a wedge between 112th Divisions left flank and the right flank of Smekhotvorov’s 193rd Division. This was a critical development for both sides; the Volga was just over one kilometer away and, if the Germans reached it, the heart of the 62nd Army would be ripped in two, enablng the Germans to bring the Red October’ lpant’s landing stage under fire. Chikov’s command post, behind the Barrikady Ordnance Factory, was in imminent danger from the west and the north.”


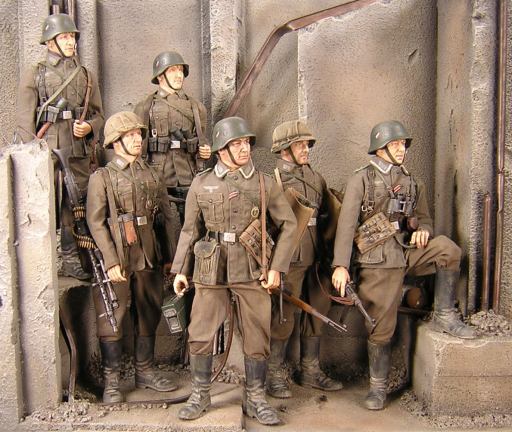
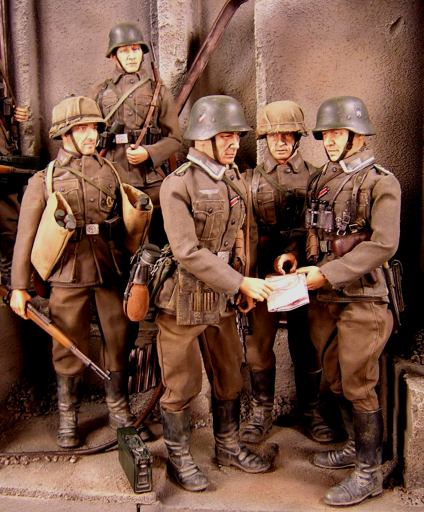
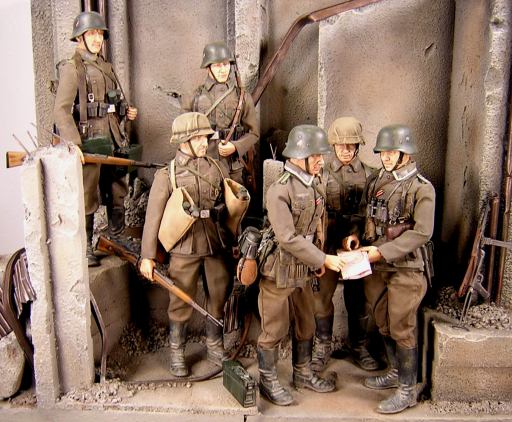
This dio represents a group of men from second company first Batallion / Panzergrenadier-Regiment 21, of the 24th Panzer Division as they coordinate the next attack towards the Volga, amongst the rubble of one of the structures in the Barrikady Industrial Complex.

The dio was inspired by a photograph on page 117 of “Campaigns of World War II; The Eastern Front: Barbarossa,
Stalingrad, Kursk and Berlin, 1941-1945” by Duncan Andersdon, Lloyd Clark and Stephen Wal
sh, publised by MBI Publishing Company. Above text is from the same book.

The Oberwachmeister (cav
alry rank equivalent to Oberfeldwebel, retained from when the 24th Pz Div was the 1st Cavalry Division), a member of the Company’s HQ section is coordinating the attack and is giving final
instructions to the Unteroffizier who is platoon commander.

Before the snow, and before the encirclement, there were the desperate hand to hand actions in the city, as the German Army tried to reach the
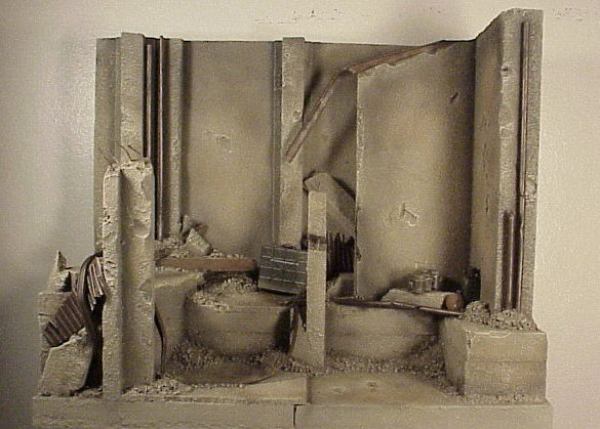
Volga and gain control of all the territory to the west of the river.


Dio Base details


Dio base is made with pieces of styrofoam glued together with carpenter’s glue and held in place with wood screws, a tecnique I developed making model railroad scenery.

Spackled the bolt holes in the foam.

I used a new technique to treat the foam before painting. I always used spackling compound, this time I painted the foam with carpenter’s glue to which I added fine ballast material from Woodland Scenics.

I added damage marks to the walls, floor etc. I then added a couple of I- beams, some styrene tubes and one bigger metal tube to make the area appear as some sort of industrial complex that had been bombed. The image that inspired this scene had a brick building, which would have beet better, but I have not been able to represent bricks in a way they look sharp enough o use in a 1/6 dio. The material available from the 1/12 scales doll houses is just too small. So I went with a representation of damaged re-enforced concrete.

I added small piles or rubble throughout. Added a piece of balsa wood to represent a fallen beam and some more “pipes” made of thin metal to which I added some damage.

I made the rubble with some small pebbles and sand I have saved, got it from the side of the road, great place to find material for modeling jobs. I pass the stuff through a sieve and save the thinner pieces in a bag and the corase part in another. I would fix the rubble in p lace with carpenter’s glue and then add diluted carpenter’s glue over it , then adding some of the thin ballast material. I kept doing this in laters for several days. Added the steel bars to a couple of damaged columns, these are thich florist wire. Also added some foam pieces to represent fallen beams or columns which I had painted with the glue and ballast mixture. I had thought of adding the beams and pipes after painting and finish these separate, but decided against it to have these pieces blend into the dio in a more natural way.

I made a large batch of grey mixture, mixing Black:White:Flat Earth (1:5:1 all Tamiya Acrylic paints, actual colors shown in capital letters) . I kept adding details to the base and then started to paint it.

Thought it would go faster by using the airbrush, eventhough my air brushes only shoot a relatively small area (about 1 ½”) it went along relatively at a good pace. I also painted the tubes and I-beams, I always want to get rid of any white color as soon as possible. I would pain these items later.

I’m not very experienced with the airgun, prefering to use dry brushing instead to create many of the airbrush effects. But this time around I wanted to use the air gun for the weathering of the dio base. I added Black to the base mixture and went over the pipes and I-beams and also sprayed the corners and rubble piles. Also sparayed some of the black on some areas of the walls. I then got another bottle with a mixture of Buff and White and sprayed it here and there. I also sparayed Flat Earth in assorted areas and kept switching from the almost black mix and the very light buff mixture, until I was satisfied with the results. I let all this dry briefly and then went over the base, dry-brushing with the original base color using a very large brush (almost 2”). I lightened this mix with Buff and White and kept dry-brushing over the piece, bringing the texture out nicely.

I then painted the beams and pipes with a mixture of Red Brown and Black, making a very dark brown color which would be the base for all these pieces, including some corrugated styrene pieces that I detailed separately. On this base I dry brushed ( ½” brush) with a mixture of the base color and Chrome Silver. Added Hull Red and yellow to the mixture in a sort of metal and rust palette of Yellow, a mixture of Yellow and Hull Red, Hull Red, my base dark red brown and Chrome Silver.

I then made a diluted mix of light brown and used as a stain on the balsa “beam”. I aded some of the same mixture all over the dio, on the rubble, on the nook and cranies.I then went over the same areas with a lighter mixture of the base color. Always like adding a bit of brownish tint to the grey color if it is to represent concrete or masonry. Pure gray just does not look right to me.

Common details.

Recent issue Dragon tunics and trousers.

NCO tunics are from Alfons and the EM tunics are from Albert.

They represent early tunics with pleated pockets.

Waffenfarbe is grass green to represent the Panzergrenadiers.

All the HS are late lighter skinned HS from Dragon,

all were washed with acrylic washes.

All  uniforms weathered with acrylic/denatured alcohol wash

and dry-brushing.


Individual details:


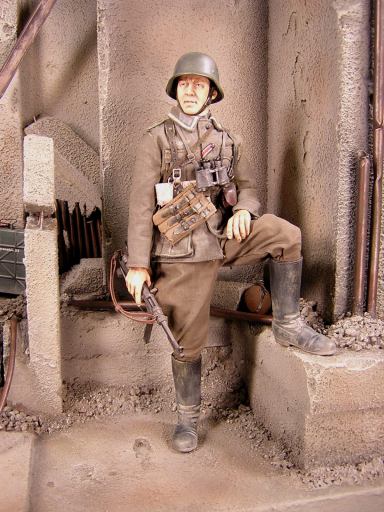
1-Oberfeldwebel (Oberwachmeister)

HS: Karl Richter

Y-straps

Holster

Map Case

Binocs and binocs case

Officer type boots

MP40 + ammo pouch

Helmet

Waterbottle on the breadbag


2-Unteroffizier

HS:Gunter Metzger

Holster

Map Case

MP41

MP40 ammo pouch

MG34 Ammo box

Regular Shovel

Helmet

Waterbottle on the breadbag


3-Obergefreiter-MG34

HS:Phillip Wagner

Y-straps

Holster

MG kit pouch

Helmet with cloth cover

Breadbag with waterbottle + mess kit


4- Schutz1 –Assault private

HS: Horst Lerner 

Y-straps and A-frame pouch

Grenade bags

Kar98 and ammo pouches

Regular Shovel

Helmet with cloth cover

Waterbottle and messkit on the breadbag


5-Grenadier

HS:Vaprossov(Signals team blonde figure)

Helmet

w/Zelt+ mess kit

Y-straps

Grenades

Kar98+ ammo pouches

Regular Shovel

Extra MG barrel in its case


6-Grenadier

HS: Harry Collins

Y-straps

A frame with Zelt and mess kit

Kar98 + Ammo pouches

Grenades

Foldable shovel

Helmet

Waterbottle on the breadbag

Two ammo boxes on leather strap


More images of the individual figures, dio base and many other pics go to these Winkflash Albums. These are the same that for many years were in Clubphoto:


http://egonzinc.winkflash.com